This document is for publishers or library administrators who need to understand, manage, customize, and deploy library installations. Topics covered in this document are:
There are some general concepts you need to understand before using Library Installer:
This section provides an overview to these concepts. For instructions on completing the related tasks, see the remaining sections in this document.
The Library Installer command-line utility, LibInst.Console.exe, is mainly for
deploying and maintaining your library content in an online environment.
The Library Installer GUI, LibInst.Gui, is the only interface to Library
Installer that your users typically see. So, as a publisher or library
administrator, you need to complete the following tasks.
LibInst.Console.exe file to manage your libraries if you:
libinst.core.dll.resources.xml) and (2) editing
the LibInst.config file.Your customers or end users (those who search and read your publications) are considered content consumers. For your content consumers using NXT Solo or Offline Publisher, or library administrators using Intranet Publisher, the Library Installer is a Windows tray application that provides the ability to download and apply updates in the background using the Internet. Although the technical name of this application is LibInst.Gui, the default name and icon displayed for your users is NXT Library Installer.
The user guide provided for your users (Maintaining Your NXT Libraries) explains the following items:
By right-clicking on the NXT Library Installer icon in the Windows tray, your content consumers can use LibInst.Gui to:
Your consumers must have internet access to get updates. If they do not have
constant Internet access, Library Installer will check for updates whenever
they do have a connection. As a publisher, you initially set the update check
frequency (the default is once a day). Your consumers can modify the frequency
to suit their needs. They can also force the application to check immediately
for updates at any time.
Use the Library Installer command-line utility (LibInst.Console.exe)
to maintain your library deployments. The LibInst.Console.exe is
located in (and executed from) the following directory: [application folder]\bin.
To start LibInst.Colsole, run LibInst.Console.exe from a command
prompt.
Figure 1 shows a usage summary of the LibInst.Console utility.
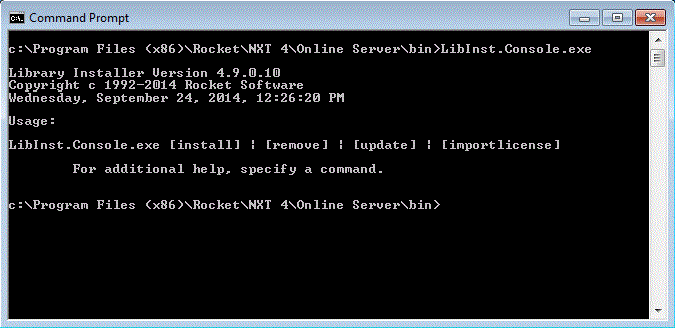
Figure 1. Usage Summary for the LibInst.Console utility
When you start the Library Installer utility you must include one of the four commands (install, remove, update, or importlicense) and the required variable (librarypath or licensefile). The utility will give you the usage summary again if you try to run the utility without these required arguments. Following are the required syntax for each of the four installation commands:
libinst.console install <librarypath>libinst.console remove <librarypath>libinst.console update <librarypath>libinst.console importlicense <licensefile>The LibInst.Console utility command syntax can be broken down into four parts:
LibInst.Console
is required. This is the name of the executable file. The LibInst.Console.exe command is
the same command, either will work the same.
install, remove, update,
or importlicense
is required. Only use one of these on any given LibInst.Console execution.
Library Installer knows, from this command, what operations it needs to
perform. Each command has its own respective options. The Library Installer
utility does not assume a default value of one of these commands.
librarypath or licensefile
is required. These are variables essential to completing the requested tasks.librarypath is the full path to the folder where you
want your library files (library
install file, content collections, and update files) to reside. This
location could be the same as your library's output directory or a completely
different directory altogether. Regardless, this directory must exist before
you run this command. If your library files reside in a different location than
the librarypath directory, you must use the /sp:
option to copy the files to the librarypath destination
location. The name of the library install file is the same for all libraries:
Library.libinst. Thus, if you plan on building multiple libraries,
each library must be in its own directory. This directory can be on a server
hard drive, CD, or DVD.licensefile is required when running the
importlicense command. This is the full path and name of the license
file (.publc ) you want to import. Normally, you and your end users
will not need to run this command directly. Your end users execute this command
when they double-click on a license file you send them or they obtain from your
e-commerce site.
[options] is not required. Any options must
follow the librarypath portion of the command. You can use all or none
of the respective options. If you do use multiple options, you can order them
in any order one after the other.
Use the install command to install or register your library
in your site's NXT Site Definition File (SDF) when mounting content on the NXT
Online Server. The SDF controls what users see on your NXT site. So, to provide
access to new library content on your NXT site you must specify in the SDF that the
content exists. When you run this command, the command records the folder and
content collection node information in the SDF.
Note: Under Offline Publisher, Solo, or Intranet Publisher, when you deploy your library to your end users for the first time and they install your library on their machine, LibInst.Console is installed and runs to install that library into the site the installation just created. However, this is completely transparent to your end users.
Running this command will also copy your library files to the librarypath
directory if it is different from your library's output directory.
Note: Unlicensed libraries are not supported in a secure installation, such as Intranet Publisher or Offline Publisher.
Figure 2 shows a sample usage summary of the install command and its options.
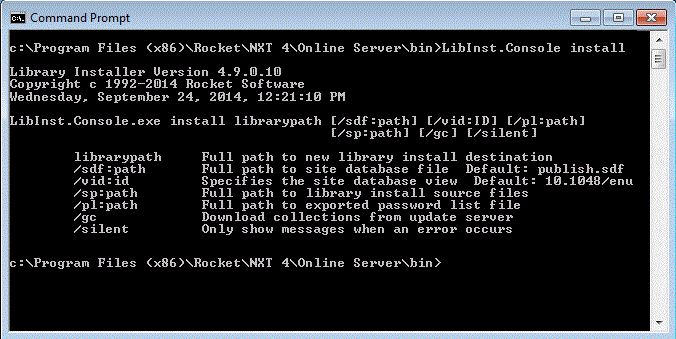
Figure 2. Usage summary of the install command
Table 1 shows options for the install command of the LibInst.Console utility.
Table 1. Options of the install command
| Option | Example/Description |
|---|---|
librarypath |
Syntax: libinst.console install c:\...\library_folderThis variable is required. This is the directory where your library files ( Library.libinst
and content collection files) currently reside, OR, it is the directory for
where you want your library files to reside.If your library files already reside in this directory, you may not need any other options to install your library. If your library files reside in a different directory, you can either copy them into this location yourself before running LibInst.Console, or, use the /sp option and have LibInst.Console
copy them for you. This must be an existing directory. LibInst.Console will not
create it for you.The path must be to writable media. During an update, the latest library install file and any updates are copied or downloaded to this location. This path cannot change after you install the library. |
/sdf:path |
Syntax: libinst.console install <librarypath> /sdf:c:\...\your_site.sdfUse this install option to specify the SDF you want to install your library into. If you do not specify the SDF with this option, the Library Installer utility will install your library into Publish.sdf, located in the
[application folder]\bin directory, which is the default SDF set up
during NXT 4 install. |
/vid:id |
Syntax: libinst.console install <librarypath> /vid:id_of_viewUse this install option to include your library in a particular view on the target site. If you do not specify this parameter LibInst.Console will include your library content in the 10.1048/enu view. This view was built
during the NXT 4 install, which is the default view for the sample site. |
/sp:path |
Syntax: libinst.console install <librarypath>
/sp:c:\...\library_files_folderUse this install option to specify the path to the location of the library files including Library.libinst. If your library install file,
content collections (.nxt files), and update (.upd)
files do not reside in the same location as the librarypath
but reside on an accessible server, the /sp option allows you to
identify the location of those files. This path is different than the librarypath.
When you use this option, Library Installer copies the library files into the
librarypath location at install time.If your library files reside on a CD or DVD with a valid
MediaInfo.pid file, Library Installer will only copy the
library install file to the librarypath directory.
Library Installer assumes you want the content collection files (.nxt)
to stay on the CD. If you do not want your .nxt files to remain on
the CD, you must manually copy them into the librarypath directory
before running this command. |
/pl:path |
Syntax: Note: You could use this option with Solo or Intranet Publisher, but we strongly advise against it. If you are deploying your library files to NXT Solo users, we strongly recommend you DON'T use this feature for security reasons, because your passwords will be stored in clear text in the site definition file (.sdf). See the "File Menu" topic and the "Library Manager Files" table in Library Manager for more information on exporting passwords. |
/gc |
Syntax: libinst.console install <librarypath> /gcUse this install option to get collections or retrieve all library files (library.libinst and NXT files) from an update server site that is listed in the library install file. |
/silent |
Syntax: libinst.console install <librarypath> /silentUse this option to reduce console output to errors only and suppress progress and status output. When you run LibInst.Console with the /silent option,
if no message displays, then the install command executed successfully. |
Use the remove command to remove a library from a Site
Definition File. You would use this command before doing a fresh install of
your library (in a testing environment) on the same site, instead of updating.
This command does the exact opposite of the install command.
Figure 3 shows a usage summary of the remove command and
its options.
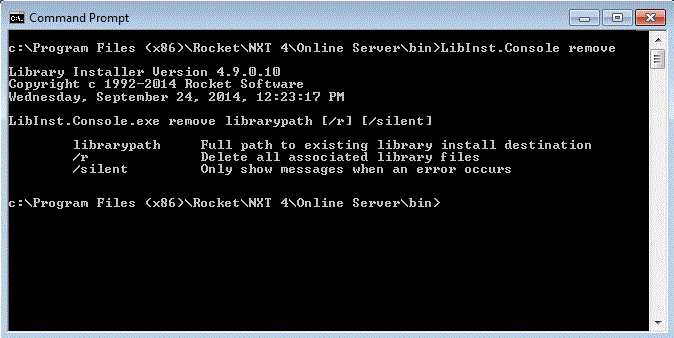
Figure 3. Usage summary of the remove command
Table 2 shows options for the remove command of the LibInst.Console utility.
Table 2. Options of the remove command
| Option | Example/Description |
|---|---|
librarypath |
Syntax: |
/r |
Syntax: libinst.console remove <librarypath> /rUse this option to remove the reference to your library from the SDF and to delete the library files ( Library.libinst and content collection
files). In order to remove these files, they must reside on writable media. |
/silent |
Syntax: libinst.console remove <librarypath> /silentUse this option to reduce console output to errors only and suppress progress and status output. When you run LibInst.Console with the /silent option,
if no message displays, then the remove command executed successfully. |
Use the update command to update library collections that are
deployed on an NXT site.
When you run this command, Library Installer (1) takes each collection it needs
to update offline, (2) merges each update file into its parent content
collection file, and then (3) puts the collection back online. If there are any
new content collections (.nxt files), the update command will also
copy the new collections and your library install file to the librarypath
directory (if needed) and install the new content collections. Figure 4 shows a
sample usage summary of the update command and its options.
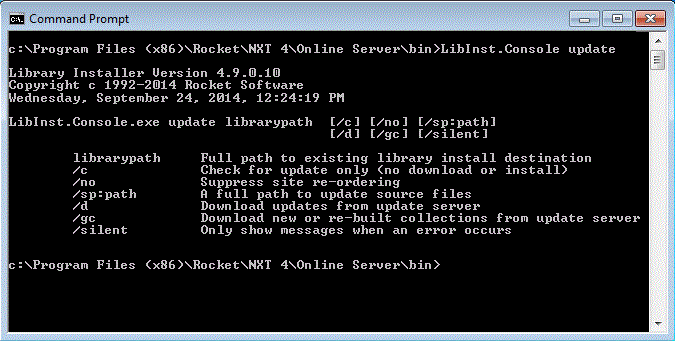
Figure 4. Usage summary of the update command
Table 3 shows options for the update command of the LibInst.Console utility.
Table 3. Options of the update command
| Option | Example/Description |
|---|---|
librarypath |
Syntax: |
/c |
Syntax: libinst.console update <librarypath> /cUse this update option to check for updates on the update servers and report the results to the console, but do not download and apply the updates. |
/no |
Syntax: libinst.console update <librarypath> /noUse this update option to prevent the Library Installer utility from reordering your library content nodes in the SDF. By default, the update operation reorders the library in the SDF if it is different from the order in the library install (Library.libinst) file. Therefore, if you reorder (change the hierarchy of) your library collections in the SDF, directly or with the Content Network Manager, then you can use this option to prevent an update from changing your site structure. This update option also retrieves any update files and Library.libinst. |
/sp:path |
Syntax: libinst.console update <librarypath>
/sp:c:\...\update_files_folderUse this update option to specify the path to the location of the update files, if different than the library path. If you do not use this option to get your updates into your library path directory, you must use the /d
option. All source update files and the library install file are copied to the
specified library path at update time. This update option also retrieves any
update files and Library.libinst. |
/d |
Syntax: libinst.console update <librarypath> /dUse this update option to attempt to download an update from update servers listed in the library install file. This is an alternative to the /sp
option. Library Installer will attempt to download updates from each update
server in the order you list them in the Update Servers property of
Library Manager until all updates have been successfully downloaded. This
update option also retrieves any update files and the Library.libinst file. |
/gc |
Syntax: libinst.console update <librarypath> /gcUse this update option to get collections or retrieve all new content collections that have been added or rebuilt (as opposed to simply updated) to an existing library. This update option is similar to its install option
counterpart, in that it retrieves (1) any update files and (2) the
Library.libinst file along with the new content collections. |
/silent |
Syntax: libinst.console update <librarypath> /silentUse this option to reduce console output to errors only and suppress progress and status output. When you run LibInst.Console with the /silent option,
if no message displays, then the update command executed successfully. |
In normal circumstances you will not need to run this command from the console,
nor will your end users. This command is invoked when your end user
double-clicks on a license file that you have sent him or that they have obtained from
your license generation web site. The importlicense command essentially
installs the license on their system and allows them to access your library
content according to the license's respective subscription. Figure 5 shows a
sample usage summary of the importlicense command and its options.
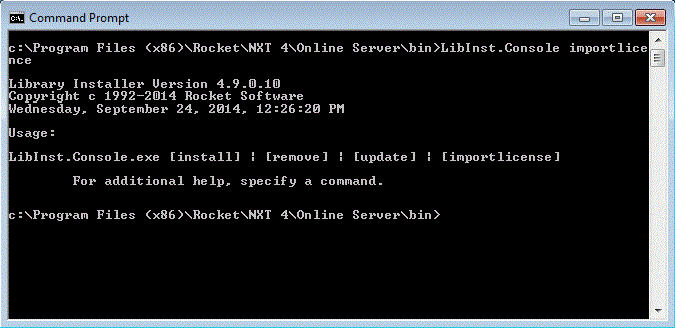
Figure 5. Usage summary of the importlicense command
Table 4 shows options for the importlicense command of the LibInst.Console utility.
Table 4. Options of the update command
| Option | Example/Description |
|---|---|
licensefile |
Syntax: libinst.console importlicense c:\...\license_file.publcThis variable is required. This is the name and location of the license (the .publc file) you want to import or install. |
/silent |
Syntax: libinst.console importlicense <licensefile> /silentUse this option to reduce console output to errors only and suppress progress and status output. When you run LibInst.Console with the /silent option,
if no message displays, then the importlicense command executed successfully. |
Your content consumers (customers or end users) will not explicitly use the command line version of Library Installer (LibInst.Console). When they install your library for the first time, and when they obtain and install updates from your update servers, LibInst.Console runs in the background. However, this is transparent to your users. Updates to their installed libraries are handled through the Library Installer GUI, which runs in the Windows system tray.
You may want to customize LibInst.Gui to meet your customer needs. The
recommended method for customizing this interface is to customize a sample file
provided (libinst.core.dll.resources.xml)
and add it to the bin folder. The sample file is provided in the Sample
Customization folder with the Solo, Offline Publisher, and Intranet Publisher
installs.
Note: Some publishers or library administrators may prefer to use the standard .NET Satellite Assembly resource override mechanism for customizations. That may be possible for most LibInst.Gui customizations (with the exception of locking portions of the user interface). However, satellite assemblies have not been tested with LibInst.Gui.
To help you configure and customize the Library Installer user interface, see the following topics:
For information about other installation branding and customization (those not related to LibInst.Gui), see Customizing Icons and Shortcuts and Configuring Install Options.
You can set the default values for the Library Installer Update window. This allows you to specify the download options (automatic or prompted) and the frequency that the Library Installer checks for updates. To set the default values, complete the following:
Sample Customization folder. This folder is a sub-folder to the Solo
Installation, Offline Publisher Installation, or Intranet Publisher
Installation directory, depending on the product you have installed.
libinst.config and change the default settings.
Copy folder in your customized installation.
CopyFile.ini file.
When LibInst.Gui starts and is running, your users will see this icon in the
Windows tray: ![]() .
.
To help your users find the LibInst.Gui for your product, you should change the icon that displays in both the Windows tray and in the upper-left corner of the application windows. You can also edit the icon name displayed. To brand this icon and related text and bubble help, complete the following:
Sample Customization folder. This folder is a sub-folder to the Solo
Installation, Offline Publisher Installation, or Intranet Publisher
Installation directory, depending on the product you have installed.
libinst.core.dll.resources.xml
and change the icon settings.
Copy folder in your customized installation.
CopyFile.ini file.
Note: If your users install library content from multiple publishers, they will have multiple tray icons. Although these look like duplicates of the original, they are not. Each tray icon corresponds to an individual library installation, and updates for these are independent from one another. To identify which icon belongs to which publisher, users can right-click on an icon and choose Show Status or Settings from the menu.
You can change the text strings in that display in the task bar. To edit these strings, complete the following:
Sample Customization folder. This folder is a sub-folder to the Solo
Installation, Offline Publisher Installation, or Intranet Publisher
Installation directory, depending on the product you have installed.
libinst.core.dll.resources.xml
and change the balloon message settings.
Copy folder in your customized installation.
CopyFile.ini file.
You can lock portions of the LibInst.Gui utility. To lock portions of the LibInst.Gui, complete the following:
libinst.core.dll.resources.xml
and <lock> settings.
Copy folder in your customized installation.
CopyFile.ini file.
To set the default values for these lockable options, you must modify the
LibInst.config file. Refer to the sample libinst.config that is provided in
redistributable installs (NXT Solo, Intranet Publisher, and Offline Publisher
installs).
Note: While it may be possible to use the standard .NET Satellite Assembly resource override mechanism for most LibInst.Gui customization (even thought satellite assemblies have not been tested with LibInst.Gui), locking portions of the user interface is not supported by satellite assemblies due to the unique design of this feature.
To distribute your customizations to your users, copy the customizations to the
user's machine as outlined in Copy
Files on Install.
This guide is intended for the user who has one or more of NXT libraries
installed. A quick way to determine if you have an NXT library installed is to
check your Windows tray (bottom-right of the screen). For every NXT library
publisher product installed on your machine (which may contain one or more
libraries), you should have one NXT Library Installer icon ![]() display in the Windows tray. (Therefore, if
you have three publisher products, you should have three icons.)
display in the Windows tray. (Therefore, if
you have three publisher products, you should have three icons.)
Library updates are set up on your machine to automatically update once a day (as long as you have an internet connection). You can mostly ignore the NXT Library Installer icon. However, you may choose to use this application at any time if you want to force an immediate update. The following topics related to library maintenance are covered in this user guide.
Note: The remaining content in this document, has been prepared for your content consumers (customers or end users). You may use this section of the document as a user guide for your users. Feel free to copy and modify this content as needed before redistributing to your users or to use this content yourself to test the user experience with the LibInst.Gui.
If you are an online user, you do not need to start the Library Installer GUI or log in (unless instructed to do so by your publisher or library admininstrator).
If you are NXT Solo or Offline Publisher user, the NXT Solo and Offline Publisher installations configure Library Installer GUI to start automatically when Windows starts. However, if Library Installer GUI does not start automatically, you can start it from the Start menu or the command line.
From the Start menu, choose Start > Programs > Rocket > NXT 4 > Online Server > Library Installer (or the path specified by your library publisher or administrator).
From the command line:
C:\>
command prompt:
C:\Program Files\Rocket\NXT 4\Online Server\bin\LibInst.Gui
C:\> command prompt:
C:\<your_install_directory>\Rocket\NXT 4\Online
							Server\bin\LibInst.Gui
If you are an NXT Solo user or Offline Publisher user, the first time you start a Library Installer GUI, you may need to log in to the update server. If this is necessary, the Library Installer will display a login window.
Note: Your domain may be different for each update server you use. For example, if you travel you may choose to use a local update server in a different domain than your regular update server. In these cases, you will be prompted to provide the login information for the alternate server.
Use the Library Installer GUI to maintain your installed libraries.
Note: LibInst.Gui does not start unless there is at least one library installed. If you do not have an installed library on your site, an error window appears informing you of such, and LibInst.Gui does not start. Contact your publisher if this happens.
To view your library maintenance options, right-click on the
Library Installer GUI icon ![]() .
.
To check the status of update downloads and installs, right-click on the Library
Installer GUI icon ![]() and choose Show Status. The
following window is displayed.
and choose Show Status. The
following window is displayed.
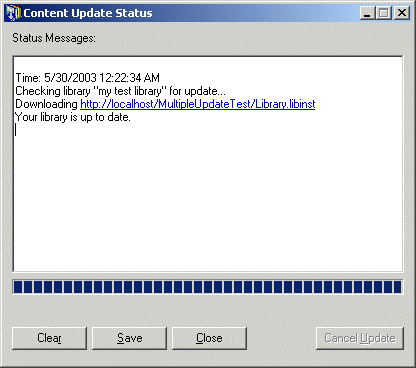
Figure 6. Show Status window of Library Installer
This window provides you with information regarding your scheduled updates as well as unscheduled updates.
If you receive an error message that the update server was not found or that the update failed, check the internet connection or contact the content publisher to determine if the update URL server has changed. Click the Save button if you want to save the status report to a text file. Click the Close button to close the status window. The Cancel Update button is only available while Library Installer is downloading and installing an update. Click this button during this time to terminate an update.
To immediately check for new updates (even when a check is not scheduled),
right-click on the Library Installer GUI icon ![]() and choose Check for Update. The
notification window for the tray icon changes to
and choose Check for Update. The
notification window for the tray icon changes to Checking for update..., and you
can view the status window (choose Show Status from the tray icon menu)
to check progress.
Downloading happens in the background when you are connected to the Internet (or your Intranet). Detection of an Internet connection is automatic. However, if you cancel a download, or disconnect before the update files are completely downloaded, the Library Installer retains a temporary copy of the data that has been downloaded to this point. Then, when it next checks for updates and detects that it still has to download the previously cancelled update file, it will resume the download from the point of interruption rather than from the beginning of the file.
This feature has been added to ensure that in situations where downloading a whole update file takes too long or cannot complete due to the reliability of the connection, it can still be retrieved over the course of a number of download attempts. When a download is resumed, the progress bar on the status window will start at the point that the last download ended. For example, if the download was interrupted after 60% of the file had been downloaded, the progress bar will start at 60% when the download is next resumed.
There are two scenarios when the resumable download feature will request again the whole file rather than resuming a previous download. The first of these occurs when the download of the interrupted file has not been running for a minimum of 5 minutes. Due to the fact that the initial download request requests the file in compressed form (and resumed downloads do not), this is an optimization to ensure that, in this situation, the whole (compressed) file is requested rather than resuming the download of most of the file in uncompressed form. The second scenario occurs if the update file is changed in any way on the server. If the Library Installer detects that the update file has changed since the last partial download, it will request again the whole file in order to ensure its integrity.
The Settings window shows the libraries that are installed from a particular publisher, the publisher information for the library, and the updates servers used by that library. It also provides update options so you may control the frequency of your updates.
To display the Settings window with the Library tab
selected, right-click on the Library Installer GUI icon ![]() , and select Settings.
, and select Settings.
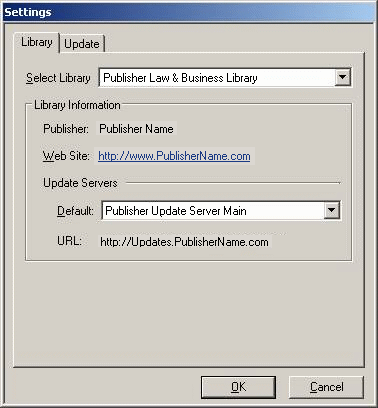
Figure 7. Library Installer Settings - Library Tab
Use the Library tab to select a library and configure its settings. Table 5 shows a list of fields of the Library tab.
| Field | Library Tab Field Description |
|---|---|
Select Library |
A drop down list contains installed libraries so you can select the one for which you want to change settings. |
Publisher |
A read-only string that contains the name of the library's publisher. |
Web Site |
A link to the library publisher's web site in case you need additional information. |
Update Servers
|
A drop down list of mirror servers you can use for updates. You can choose a default update server that is closest to your location. If that server is not available, then Library Installer will try the other update servers in the list. The Update URL is a read-only string that shows the URL for the selected mirror site. |
Click on the Update tab to see the properties in the following figure.
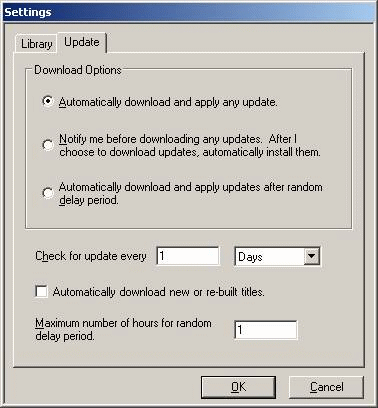
Figure 8. Library Installer Settings - Update Tab
Use the Update tab to set update preferences and to schedule updates.
| Field | Update Tab Field Description |
|---|---|
Automatically download and apply any update |
No user interaction is required. The download and update operation is completely automatic. This behaviour is consistent on scheduled updates as well as unscheduled updates. |
Notify me before downloading any updates |
Requires user interaction. If the Library Installer detects new updates on the update server, it displays a window that informs you that updates are present, and ask if you want to proceed with the download and installation of those updates. Once you confirm you want to download and install the updates, Library Installer proceeds with downloading and installing the updates as usual. |
Automatically download and apply updates after random delay period |
No user interaction is required. The download and update operation is completely automatic. The difference between this option and the first is that the Library Installer will not check for an update as soon as a network connection is detected. Instead, it will wait a random amount of time before checking for an update (between 0 and the number of hours specified in the Maximum number of hours for random delay period setting). This helps prevent network traffic bottlenecks when everyone comes into the office at 9:00 am and tries to download their updates. |
Check for Update Every |
Settings are used to specify the interval to
check for updates. LibInst.Gui always checks for updates when it first loads. If
your computer is constantly on, use this box to specify the interval to check
for updates. The starting time point for intervals is the time the application
first starts or the last time you changed the interval setting. If you want to
check for updates immediately after changing the update settings (or at any
other time), right-click on the tray icon and choose Check for Update.
Recommended update intervals depend on the publishers who provide content.
Some libraries are only updated quarterly or annually, but others might update
content daily or weekly. Publishers may set a default check for update
interval by shipping the |
Maximum number of hours for random delay period |
Sets the maximum delay the Library Installer may use before checking for updates. This option is only used when the Automatically download and apply update after random delay period option is selected. Enter the maximum amount of time, in hours, that the Library Installer may wait before checking for an update after the system connects to the network. (Valid values are 1-24, inclusive.) The Library Installer then generates a random number of minutes that it waits before performing its first check for updates. Subsequent update checks follow the values in Check for Update Every settings (assuming the system is continuously connected to the network). |
To view version information about Library Installer GUI (LibInst.Gui), right-click on the tray icon and select About.
To close the Library Installer GUI (which removes the tray icon and stops checking for library updates), right-click on the tray icon and select Exit.
If you are an Offline Publisher or Intranet Publisher user (both license-managed installations), you may find it helpful to view a list of your currently installed licenses for a particular product. The licenses control access to content, as well as the expiration dates for the content. By reviewing these periodically, you can make decisions on when to upgrade or renew your subscriptions to the publisher content.
Note: Unlicensed libraries are not supported in a secure installation, such as Intranet Publisher or Offline Publisher.
To view your custom list of installed licenses, start the
publisher's application (usually from the icon on the desktop or from the Start
menu) so you can see the content. You must then modify the URL shown in the
browser. Delete everything after http://localhost/nxt/gateway.dll? and add in
f=license&license_xsl=lbr-all-licenses.xsl. For example, your URL may look
like the following (the port number may be different or non-existent): http://localhost:2242/nxt/gateway.dll?f=license&license_xsl=lbr-all-licenses.xsl
The Library Installer is both a publisher utility and a content-consumer Windows tray application. It helps to ensure that your clients get the most current information available. As a publisher, you use the Library Installer command-line utility to install, update, and remove your libraries in and from your NXT site or CD/DVD publications and import licenses for libraries on your site. As content consumers, your customers use the Library Installer Windows tray application to check for, retrieve, and install your library updates. Library Installer used in conjunction with Library Manager provides you with an end-to-end publishing solution with automatic content capabilities for you and your clients.
Copyright © 2006-2023, Rocket Software, Inc. All rights reserved.